Generate a Synthetic FUNSD Dataset for LayoutLMv3 Fine-Tuning
SymageDocs is a synthetic document data service: pick a form from the catalog, set a quantity, and it generates rendered documents (typed or handwritten, clean or degraded) filled from coherent synthetic identities, with pixel-perfect ground truth labels in FUNSD format included with every job. No real PII, no manual annotation, no OCR pass injecting noise into your labels. You can do all of it in the web app; this walkthrough does it from Python with the SymageDocs SDK, so the dataset lives inside your training pipeline and regenerates on demand.
What you'll build: about a hundred lines of Python that install the SDK, generate nine labeled synthetic W-2s with the scanned degradation profile, sanity-check the FUNSD annotations, and convert them into LayoutLMv3 training features using the standard HuggingFace processor with
apply_ocr=False. The whole pipeline runs on a free-tier account (500 credits per month, no credit card). Scaling to 500 or 50,000 documents afterward is a one-parameter change.
Most synthetic-data articles (ours included) argue about why. This one is purely how: starting from an empty virtualenv, end with a directory of rendered form images and FUNSD annotations that a LayoutLMv3 fine-tuning loop will accept, plus the handful of SDK and dataset details (seeds, idempotency keys, transform sidecars, what's included without asking) that save you a support ticket later.
Why does any of this need to be synthetic? Because real W-2s are radioactive PII you cannot legally stockpile, hand-annotating form images runs dollars per page at training scale, and OCR-derived labels bake recognition errors directly into your ground truth. Synthetic generation sidesteps all three: the generator knows every word and box it placed, so the labels are exact by construction.
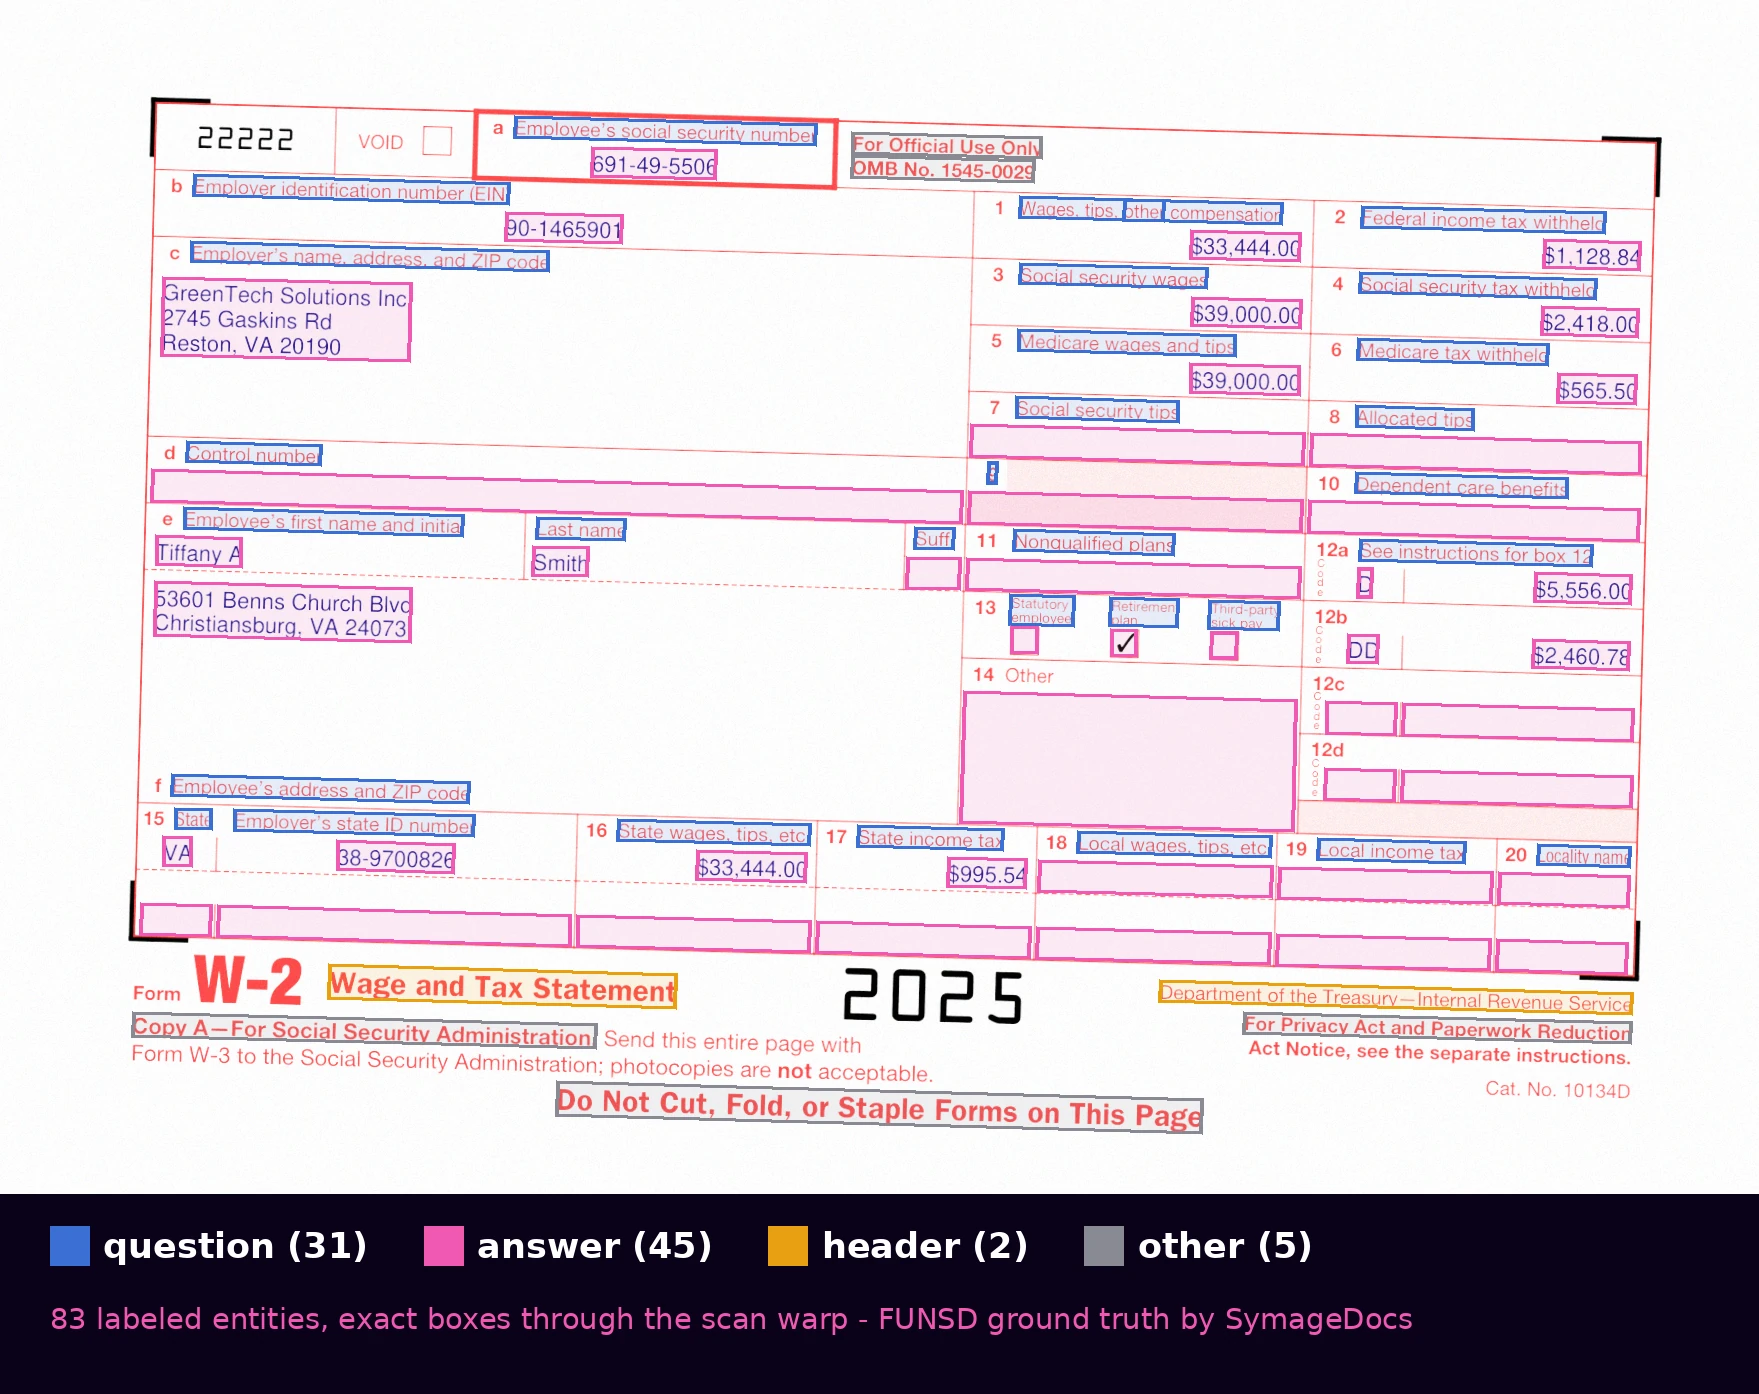 Every entity on the page, labeled and boxed: 45 answers, 31 questions, 2 headers, 5 other. The boxes are reprojected through the scan warp, so they stay exact even on degraded renders.
Step 0: Set up Python Environment and Authenticate
python -m venv .venv
source .venv/bin/activate

pip install symagedocs
pip install pillow transformers torch
You will need a SymageDocs account. Navigate to symagedocs.ai and create an account or log in if you already have one. Click on the Account dropdown in the upper-right corner of the screen and select API. Create a new key, and when the new key is displayed, copy it and paste it to a safe place. At your command line, enter the following line, inserting your new API key inside the quotes:
export SYMAGEDOCS_API_KEY="paste key here"
Now create a Python source file and add:
from symagedocs import Client

client = Client()  # reads SYMAGEDOCS_API_KEY from the environment

balance = client.account.balance()
print(f"credits used: {balance.credits_used} / {balance.credits_allocated}")
Running this code results in the output below. It shows that no credits have been used or allocated yet.
credits used: 0 / 0
There's an AsyncClient with the same surface if your pipeline is async; everything in this article translates one-to-one.
Step 1: Pick a Form from the Synthetic Document Catalog
The catalog is queryable. Every form carries its category, family, and field definitions. Append the following to your Python file:
for f in client.forms.list(category="tax"):
    print(f"{f.id:28s} {f.name:50s} {f.field_count:3d} fields")

detail = client.forms.get("irs_w2_2025")
print(detail.page_count, "page(s),", len(detail.fields), "field definitions")
When run, it will list all the forms available in the "tax" category. We'll use irs_w2_2025. The W-2 is the canonical key-information-extraction target, and its field definitions (box numbers, employer block, state rows) map cleanly onto entity labels.
Step 2: Create the Generation Job
Add more code to your program:
job = client.generate.create(
    "irs_w2_2025",
    quantity=9,
    output_formats=["pdf_typed"],
    degradation_profile="scanned",  # degraded page rasters ship in the dataset
    seed=1337,
    idempotency_key="w2-layoutlm-train-v1",
)
print(job.job_id, "-", job.credits_required, "credits")
When run, it will print everything we've seen so far plus a job ID and the number of credits it would take to run that job.
Why is quantity nine? Credit math. A typed PDF prices at 20 credits plus 2 per additional 25 fields past the first 25, so the 45-field W-2 lands at 22, and the scanned profile multiplies that by 1.2. Nine scanned W-2s come to 238 credits, well within the free tier's 500 credits per month. The exact cost is shown in credits_required before anything is charged. The walkthrough runs end to end on a new account, and scaling the corpus afterward is a paid-tier change to one parameter.
Four parameters here deserve a sentence each, because they're the difference between a demo script and a pipeline:
output_formats: you only request render formats. FUNSD annotations, structured JSON ground truth, and CSV are always included in every job. They're foundational outputs, not options. (If you pass "funsd" explicitly the API rejects the request, precisely because it's not a choice.) And because degradation happens at the raster level, degraded jobs include the page images in the dataset automatically.
degradation_profile: clean, scanned, faxed, photographed, or mixed. Match it to your production capture path. Degraded profiles carry a credit surcharge (20 to 30 percent), shown in credits_required before anything is charged. Intensity is tunable too; the hero image above is scanned at medium intensity, and the hard end of the range looks like this:
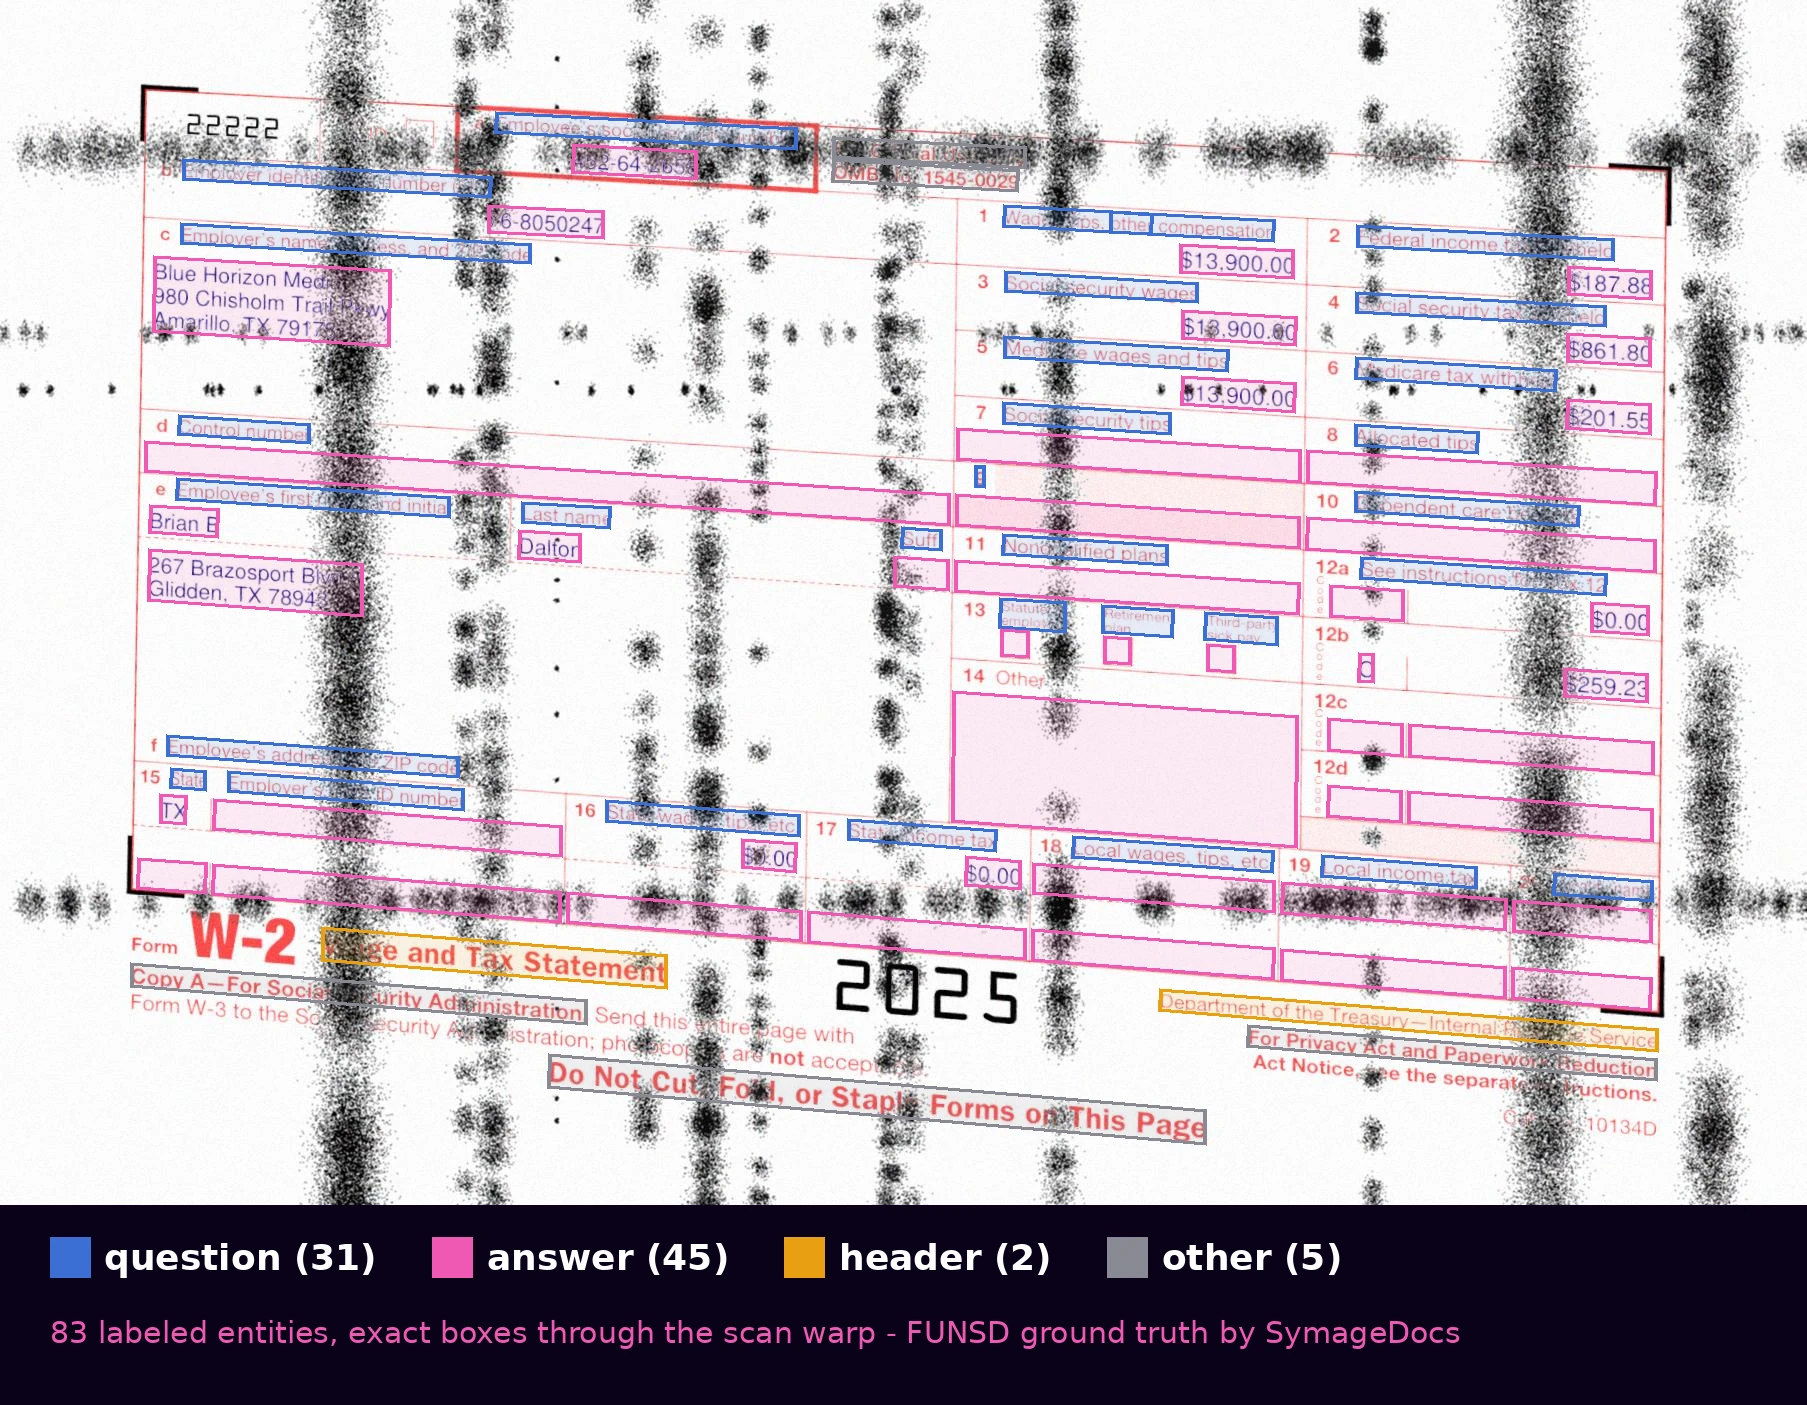
scanned at heavy intensity with every artifact enabled: stains, fold marks, shadows, perspective warp. The labels still land exactly where the words are. That alignment is the whole value of generated ground truth.
seed: fixes the generation so the dataset is exactly reproducible. Treat it like a lockfile: commit the seed and the form ID next to your training config, and any checkpoint can be traced back to the exact corpus that trained it.
idempotency_key: if your orchestrator retries the POST (network blip, worker restart), the same key returns the original job instead of generating, and charging, twice. Stripe-style; cheap insurance in any automated pipeline.
Add two more lines of code that wait for the job to complete and download the result:
client.generate.wait(job.job_id)  # polls until the job is terminal
client.generate.download(job.job_id, "dataset", "./w2_dataset.zip")
Creating the ZIP file and downloading it can take 20 to 30 seconds, so be patient.
Step 3: What's in the Dataset
Unzip it. A degraded job's dataset looks like this, and three pieces matter for training (clean jobs are identical minus images/, since there's no raster degradation step):
w2_dataset/
  manifest.json                  dataset metadata, splits, coordinate space
  images/typed/                  degraded page rasters (PNG), one per page
  annotations/funsd/typed/       one FUNSD JSON per annotated page
  transforms/typed/              per-page transform sidecars
  ground_truth/                  structured JSON + CSV answer keys
  pdfs/typed/                    the rendered documents
Two details that save a support ticket: pages with zero entities (blank instruction sheets on multi-page forms) are omitted from annotations/, so don't be surprised when an 11-page W-2 PDF yields one annotated page. And FUNSD boxes are emitted in a canonical pre-degradation coordinate space; the matching sidecar in transforms/ carries the projective matrix that reprojects them onto the degraded raster. Skip that reprojection and a scanned-profile dataset will train on misaligned boxes. The code in Step 5 applies it in a dozen lines.
Step 4: Inspect the FUNSD Annotations Before Training
Before converting anything, look at a few annotations. Create a new Python file, add this code, and run it:
import json
from pathlib import Path

dataset_root = Path("./w2_dataset")  # unzipped dataset
pages = sorted(dataset_root.glob("annotations/funsd/typed/*_funsd_p*.json"))
print(len(pages), "annotated pages")

for p in pages[:5]:
    entities = json.loads(p.read_text())["form"]
    labels = [e["label"] for e in entities]
    print(p.name, len(entities), "entities -",
          labels.count("question"), "questions,",
          labels.count("answer"), "answers")
The entity labels are the standard FUNSD four (question, answer, header, other), with box as [x0, y0, x1, y1] pixel coordinates and words carrying the word-level breakdown each entity is built from. That structure is everything the rest of this article needs: because each entity carries its words, converting FUNSD to BIO sequence labels is the short loop in Step 5.
FUNSD-format ground truth ships with every job automatically; it's the foundational annotation output. Labeled exports in BIO, COCO, YOLO, and Donut formats are also available on request, but this walkthrough converts FUNSD to BIO directly, so it runs on any dataset without requesting anything extra.
Step 5: Convert FUNSD Annotations to LayoutLMv3 Features
The conversion is the standard FUNSD recipe with one dataset-specific addition: locate each page's raster, apply the transform sidecar to reproject boxes through the scan warp, flatten entities to words carrying their label in BIO form, and normalize boxes to the 0 to 1000 grid LayoutLM expects.
Create a third Python file. First add the support functions:
import json
from pathlib import Path
from PIL import Image

LABEL_LIST = ["O", "B-HEADER", "I-HEADER", "B-QUESTION", "I-QUESTION", "B-ANSWER", "I-ANSWER"]
LABEL2ID = {l: i for i, l in enumerate(LABEL_LIST)}

def project(pt, M):
    x, y = pt
    d = M[2][0]*x + M[2][1]*y + M[2][2]
    return ((M[0][0]*x + M[0][1]*y + M[0][2]) / d,
            (M[1][0]*x + M[1][1]*y + M[1][2]) / d)

def project_box(box, M):
    x0, y0, x1, y1 = box
    pts = [project(p, M) for p in [(x0, y0), (x1, y0), (x0, y1), (x1, y1)]]
    xs, ys = [p[0] for p in pts], [p[1] for p in pts]
    return [min(xs), min(ys), max(xs), max(ys)]

def normalize_box(box, width, height):
    clamp = lambda v: max(0, min(1000, int(v)))
    x0, y0, x1, y1 = box
    return [clamp(1000 * x0 / width), clamp(1000 * y0 / height),
            clamp(1000 * x1 / width), clamp(1000 * y1 / height)]

def load_page(funsd_path: Path, dataset_root: Path):
    doc = json.loads(funsd_path.read_text())
    base, page = funsd_path.stem.rsplit("_funsd_", 1)
    surface = funsd_path.parent.name  # "typed" or "handwritten"
    image_path = next((dataset_root / "images" / surface).glob(f"{base}*_{page}.png"))
    sidecar = dataset_root / "transforms" / surface / f"{image_path.stem}.transform.json"
    M = json.loads(sidecar.read_text())["transform"]["matrix"]

    image = Image.open(image_path).convert("RGB")
    width, height = image.size

    words, boxes, labels = [], [], []
    for entity in doc["form"]:
        label = entity["label"]
        emitted = False
        for word in entity["words"]:
            if not word["text"].strip():
                continue
            words.append(word["text"])
            boxes.append(normalize_box(project_box(word["box"], M), width, height))
            if label == "other":
                labels.append(LABEL2ID["O"])
            else:
                prefix = "I-" if emitted else "B-"
                labels.append(LABEL2ID[prefix + label.upper()])
            emitted = True
    return image, words, boxes, labels
And the hand-off to the model is exactly the stock HuggingFace flow:
from transformers import LayoutLMv3Processor, LayoutLMv3ForTokenClassification

processor = LayoutLMv3Processor.from_pretrained("microsoft/layoutlmv3-base", apply_ocr=False)
model = LayoutLMv3ForTokenClassification.from_pretrained(
    "microsoft/layoutlmv3-base", num_labels=len(LABEL_LIST)
)
dataset_root = Path("w2_dataset")
pages = sorted((dataset_root / "annotations" / "funsd" / "typed").glob("*_funsd_*.json"))

image, words, boxes, labels = load_page(pages[0], dataset_root)
encoding = processor(image, words, boxes=boxes, word_labels=labels,
                     truncation=True, padding="max_length",
                     return_tensors="pt")
outputs = model(**encoding)
print(outputs.logits.shape)  # [1, seq_len, 7] - it trains from here
apply_ocr=False is the line that makes synthetic data pay off: you're feeding ground-truth words and boxes from the generator, so the usual Tesseract pass, and the OCR noise it injects into your labels, disappears from the training loop entirely. Wrap load_page in a datasets.Dataset.from_generator and you have the input the standard LayoutLM fine-tuning recipes expect.
Note: With the truncation parameter set to True and padding set to "max_length", any tokens past 512 are silently dropped. It doesn't affect this example, but if you extend this to larger applications, you should keep it in mind.
Step 6: Where to Take It
From this skeleton, the upgrades are each one parameter:
Handwriting: switch to handwritten output (available on paid tiers), with ink_color_distribution={"blue": 60, "black": 30, "red": 10} and writer_consistency="per_document" for realistic pen behavior. Same fields, same ground truth, a much harder visual distribution.
More layouts: swap the single form ID for a loop over a form family, or pass form_ids=[...] for a coherent multi-form job where every document in a set is filled from the same synthetic identity, so a W-2 and a 1040 from one person agree with each other.
Scale: quantity is the only number that changes. Nine documents fit the free tier; the same script runs at 500 or 50,000 on a paid tier, and the labels stay exact at any volume. That's the point.
Frequently Asked Questions
Do I need a paid plan to use the SymageDocs SDK? No. The Python SDK and API are available on every tier, including the free tier. This entire walkthrough runs end to end on a fresh free account with no credit card.
Does SymageDocs output FUNSD format? Yes. FUNSD annotations, structured JSON ground truth, and CSV ship with every generation job automatically. They're foundational outputs, not options.
Can I train LayoutLMv3 on synthetic data?
Yes. Because the generator produces ground-truth words and bounding boxes, you can pass apply_ocr=False to the LayoutLMv3 processor and skip the OCR step entirely, which removes OCR noise from your training labels. The conversion from FUNSD entities to BIO token labels is about fifty lines of standard Python, shown in Step 5.
How much does a synthetic W-2 dataset cost? The free tier includes 500 credits per month with no credit card required. The nine-document walkthrough in this article fits inside that monthly allowance, and every job shows its exact credit cost before anything is charged. For training-scale volumes, see pricing.
Run It Free Today
The free tier gives every account 500 credits per month, no credit card. The nine-document walkthrough above fits inside that allowance, so you can run it end to end and put real (synthetic) tensors through your training loop today. When the sanity checks pass, growing the corpus to training scale is a one-parameter change on a paid tier. Start for free, pip install symagedocs, and the dataset is one script away.
Ready to generate synthetic document data?
Start with 500 free credits. No credit card required.
Start for Free